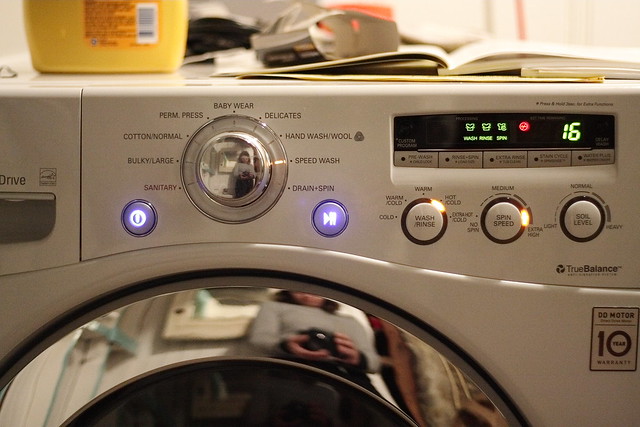
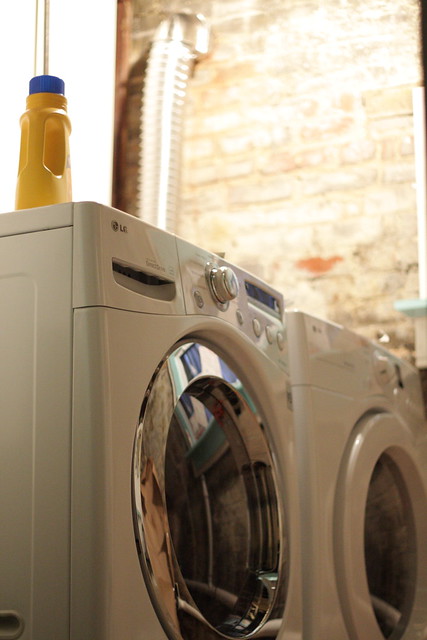
Four days ago, Hyeseung and I tested out the laundry machines, purchased many months ago, and their installation, completed five days ago. I took photographs and promptly drove off to New York to visit friends, celebrate the New Year, and retrieve a few power tools and furniture out storage.
Thank you to Toby for filling in at blog headquarters yesterday. Both T&H will be posting blog entries from time to time. So keep an eye out for that.
In additional blog news, we have received requests for more (or any) pictures of T&H. With this in mind, Hyeseung and I set about documenting the first load of laundry washed and dried in the new laundry room.
There is something so luxurious about doing laundry in the privacy of your own home. I know I haven't had this luxury in at least ten years. Even having laundry in one's building just isn't quite the same, though it is a step up from five stories down and six blocks away. Laundry in your own home! You can leave your clothes in the machines. You can warm up your jeans before changing into them on a cold winter morning. You don't have to wear clothes to wash clothes.
Admittedly, that last one doesn't apply here, since I'm living in the house with my brother and his wife, but the general idea still applies: the level of privacy and security you experience in your living room, you now also experience while doing your laundry.
There's no more wondering, "Did someone steal my t-shirt?" Conversely, there's no more blaming your own forgetfulness on innocent patrons of laundromats.
Plus, look at all all the shiny buttons and options! T&H bought HE (high efficiency) machines from LG, and they make the cutest sounds when you turn them on and make your selections.
Hyeseung and I set about taking lots of photos documenting this first load, but the actual activity of running the machines quickly absorbed our interest, and I forgot to shoot more pictures.
I hope that words are sufficient to express that the machines worked and worked well in a little room in our basement, far away from the laundromat; and we are grateful.
Showing posts with label laundry room. Show all posts
Sunday, January 2, 2011
Wednesday, December 29, 2010
Basement Laundry, Part VI: The Plan
Now that I've written a handful of posts detailing some of the parts of the Laundry Room, I figure it might be helpful to zoom out and take a look at the sum of all parts.
For those who haven't read the other posts, and as a reminder to those who have, our laundry room is in the basement of the house, just west of the back stair.
The drawing above is meant to show the as-built conditions of the basement, and it is generally accurate. But some things in the drawing are generalized. For instance, the area labeled "BOILER" is home to more than just a boiler, and the area marked "LAUNDRY" is actually only the location of the dryer.
So, let's zoom in on the laundry area for a more accurate view of how the space was programmed and where the utilties were located, when T&H first bought this house.
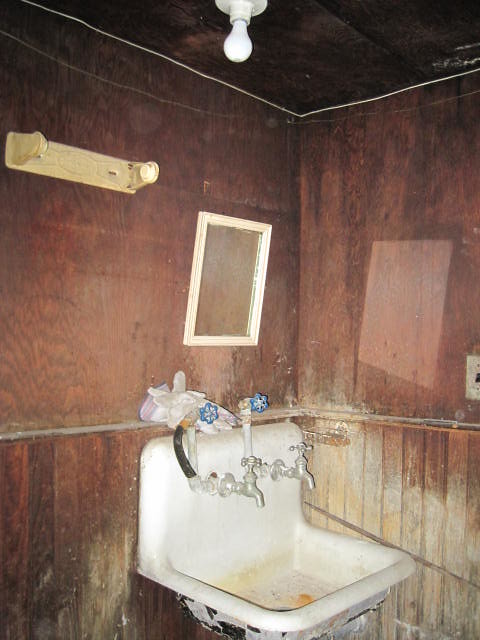
As you can hopefully make out from that lovely photoshopped drawing above, the washing machine was not even inside the laundry room. There is a sink next to the washer, and the washing machine water supply hookups were retrofitted to the sink fixture.
The plan for the new laundry room, in addition to just cleaning and scrubbing and slapping a few coats of paint on the place, is to demolish the shower, move the sink inside the room, move the dryer vent from the window to the wall, replace the window, repair the brick wall (a task with many, many sub-tasks), and install working laundry machines.
One thing to note, the washer and dryer squares in these drawings are purely graphical; they are not to scale. The washer and dryer that were in the house when T&H bought it were undersized and similar to what is drawn here. T&H bought full size machines, and they are a bit tight in the space.
The only tasks we have left in this room are to fix the brick wall, add some trim, finish painting, move the electrical, and install the sink. Even then, this will be a roughly finished room, no bells or whistles or smooth surfaces, so there will always be room for improvement. Like adding a door!
I wish I knew all of the people who have lived in this house. I suppose I could and should look up the public records someday, for curiosity's sake at the very least. But it would be nice to be able to talk to them and learn about the way this house was lived in and the way lives changed and how the house changed with them.
It is pretty evident that this room was not originally designated for laundry machines. But the waste connection for the sink and toilet (and once for the shower) are all encased in the basement's concrete floor. When did the basement get a concrete floor? When was the cast iron sewer line put in?
If the room was built as a bathroom, why the extra space to the west of the doorway? Just a place to change one's clothes? Was this once a tiny, unheated bedroom that was converted to a bathroom when the front waste stack was installed for the house?
My best guess right now is that this was originally built as a bathroom, and it was put in at the same time as the basement floor, some time in the first half of the twentieth century. (I know, I'm really pinpointing it there.) About a third of the nails used in the walls are old-style, unbending, iron nails and the other two-thirds are newer, but I don't know enough about nails to guess at a decade. Yet.
Of course these questions lead to larger questions of when were the different portions of this house built? Was it built in stages? Many people on our block talk about these homes and speculate when different portions of the houses were added on. Right now, I'm not convinced that any part of our house, any part that's still standing anyhow, was an addition. There are no interior brick walls that once marked the end of the house. There aren't, yet discovered, any traces of such walls, either. The foundation walls seem uniform, the symmetry to adjacent homes, intentional.
We will keep digging to find clues to the answers to these questions, and in the meantime, we'll be washing our clothes in the luxury of our own home.
For those who haven't read the other posts, and as a reminder to those who have, our laundry room is in the basement of the house, just west of the back stair.
The drawing above is meant to show the as-built conditions of the basement, and it is generally accurate. But some things in the drawing are generalized. For instance, the area labeled "BOILER" is home to more than just a boiler, and the area marked "LAUNDRY" is actually only the location of the dryer.
So, let's zoom in on the laundry area for a more accurate view of how the space was programmed and where the utilties were located, when T&H first bought this house.
As you can hopefully make out from that lovely photoshopped drawing above, the washing machine was not even inside the laundry room. There is a sink next to the washer, and the washing machine water supply hookups were retrofitted to the sink fixture.
| Check out the soap deposits on that wainscoting. |
![]() |
The only tasks we have left in this room are to fix the brick wall, add some trim, finish painting, move the electrical, and install the sink. Even then, this will be a roughly finished room, no bells or whistles or smooth surfaces, so there will always be room for improvement. Like adding a door!
I wish I knew all of the people who have lived in this house. I suppose I could and should look up the public records someday, for curiosity's sake at the very least. But it would be nice to be able to talk to them and learn about the way this house was lived in and the way lives changed and how the house changed with them.
It is pretty evident that this room was not originally designated for laundry machines. But the waste connection for the sink and toilet (and once for the shower) are all encased in the basement's concrete floor. When did the basement get a concrete floor? When was the cast iron sewer line put in?
If the room was built as a bathroom, why the extra space to the west of the doorway? Just a place to change one's clothes? Was this once a tiny, unheated bedroom that was converted to a bathroom when the front waste stack was installed for the house?
My best guess right now is that this was originally built as a bathroom, and it was put in at the same time as the basement floor, some time in the first half of the twentieth century. (I know, I'm really pinpointing it there.) About a third of the nails used in the walls are old-style, unbending, iron nails and the other two-thirds are newer, but I don't know enough about nails to guess at a decade. Yet.
Of course these questions lead to larger questions of when were the different portions of this house built? Was it built in stages? Many people on our block talk about these homes and speculate when different portions of the houses were added on. Right now, I'm not convinced that any part of our house, any part that's still standing anyhow, was an addition. There are no interior brick walls that once marked the end of the house. There aren't, yet discovered, any traces of such walls, either. The foundation walls seem uniform, the symmetry to adjacent homes, intentional.
We will keep digging to find clues to the answers to these questions, and in the meantime, we'll be washing our clothes in the luxury of our own home.
| (One of these days I'll get a wider angle lens. Or this baby.) |
Monday, December 27, 2010
Basement Laundry, Part V: Dryer Exhaust
We've had a long Christmas break and done little to the house since Thursday. In that time we did get a lot of cooking and eating done, and unpacking of boxes (mostly kitchen related), and fixing of Kitchenaid, and talking with relatives far away.
We had planned to be with family in North Carolina today, but snow prevented our travel, so, here in Baltimore, I very slowly returned to working on the house.
I miss our contractor. His name is Gerry and he has an assistant named Kyle. Almost every day, for the two weeks before Christmas, they were at our house burning through To Do lists with work in nearly every room.
One of those rooms was the laundry room, and the item on the To Do list was Cut Hole in Brick Wall for Dryer Vent.
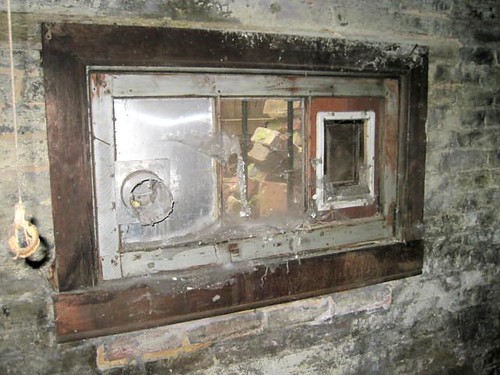
Behold the window in the laundry room as it looked when T&H first bought the house. In addition to being a pleasant home for many a spider, the window features a lovely stray cat entrance to the right and a convenient dryer vent to the left.
Had it not been for Gerry, the whole idea of re-routing our dry vent would have completely flown under our radar. With the thousands of individual tasks that need to be completed in this house, coupled with the fact that none of us have ever owned a house or a dryer before, I'm sure that our solution to this little problem would have been to install a newer, shinier, water-tight, cat-door-less version of the system shown above.
But when I was talking with Gerry a few months ago, and we were going over some of the plans for the rehabilitation of the house, he was listing out all of the tasks for the laundry room: ripping out shower, removing panelling, adding water lines, reinstalling panelling, cleaning brick, hanging sink, moving electrical, installing new window, cutting hole in the brick for a proper dryer vent....
It just rolled off the list like it was the obvious and easy thing to do.
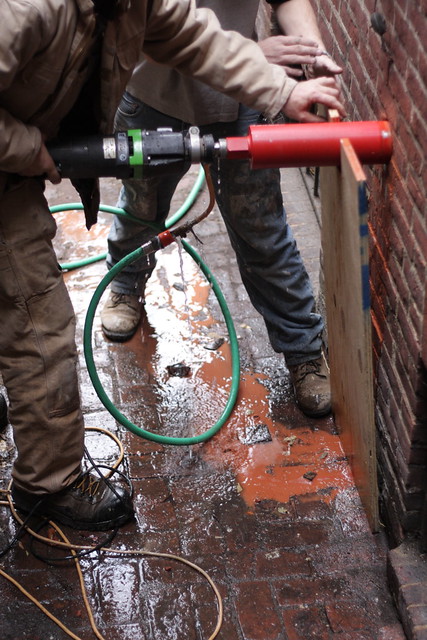
And to anyone out there who is going, "Well, duh," but who also hasn't actually rented and wielded a hand-held diamond core drill with a 4" bit and cut through 8 inches of questionably mortared structural brick wall... well, I guess you're still right, but you gotta see this thing in action:
I am really glad that Gerry and Kyle were here to do this. For them, it was simple and obvious, and it was something that they already knew how to do. I think that if we ever need another hole cut in our wall, I would not be terrified to do it myself, but only because I have had the opportunity to watch and learn from these professionals.
It was so cool! And so quick, easy, and clean!
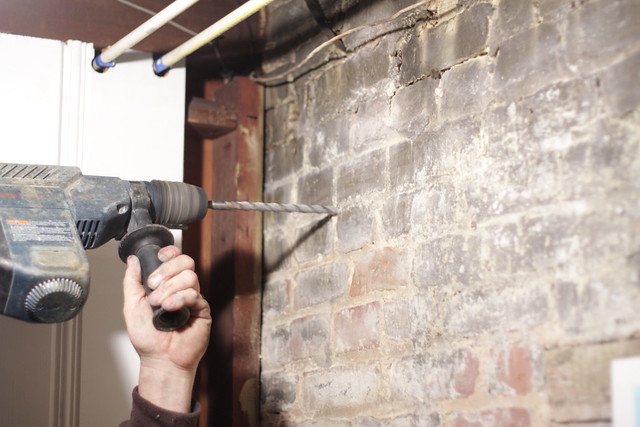
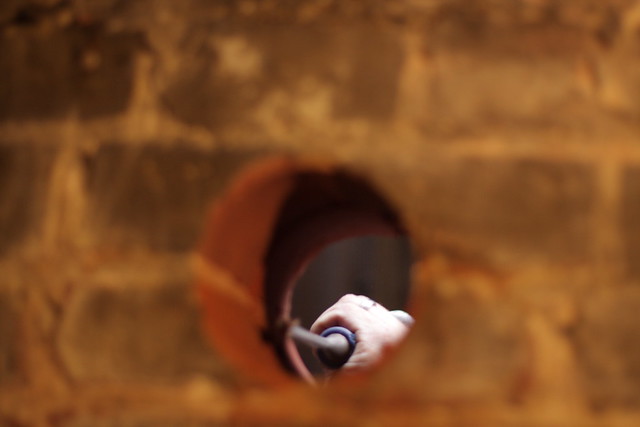
First, Gerry drilled a small hole through the wall from the inside, to mark the coring location on the outside of the wall.
He positioned the hole high on the wall so that the vent would be easier to access for cleaning, both from the inside and outside of the house.
He cut plywood for a jig to hold the core drill in place while beginning the cut, and he angled the corer slightly upward, as it cut into the house, so that if water were ever to get into the vent, it would drain out of the house, not in.
After Gerry started the cut, Kyle went inside to wet vac any slurry that might come through the wall. I ran inside to take pics.
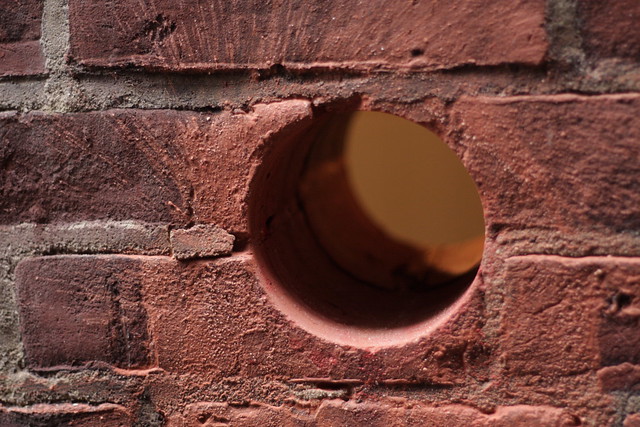
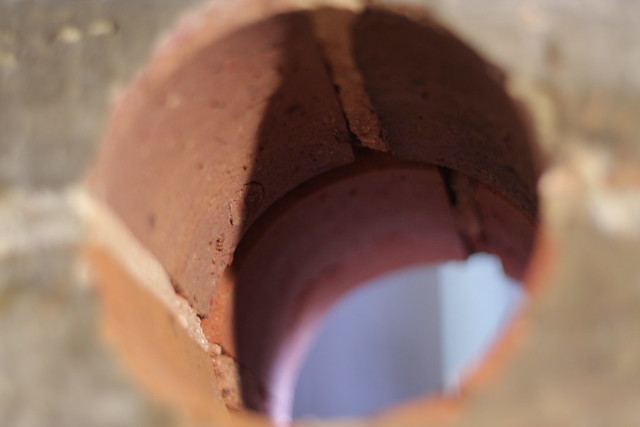
Much nicer than taking a chunk out of our window space!
All that was left to do was the installation of the vent itself. The duct is 4" in diameter, like this hole, but the connection between the duct and the vent face is a little wider, so Kyle chiseled the edge of the hole to accomodate.
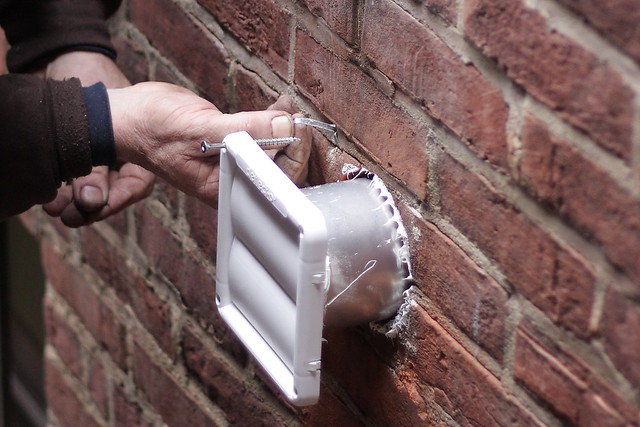
The vent and duct then got inserted, and the vent fastened to brick wall with screws and sealed with caulk. I mentioned before that the mortar in this wall is questionable, and though Gerry was able to cut a beautiful clean hole straight through, when fastening the vent to the brick, one of the screws met with a soft spot in the mortar.
And I got to learn a new trick! In order to get the screw to bite in a hole that was now a bit too large, Gerry inserted a couple strips of metal into the hole, much like you might with toothpicks into a hole in wood where a hinge has ripped out and you want to put the same screws back in the same place.
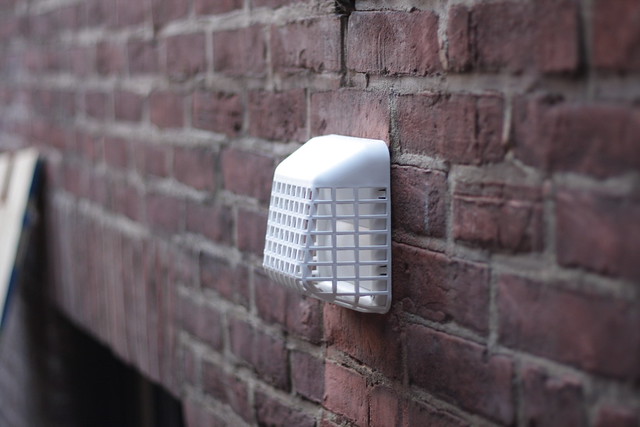
And voila! We now have a beautifully finished dryer vent, hockey masked to discourage vermin. A huge improvement.
Our budget for professionals is running out, so we probably won't be able to work with Gerry again until spring, when the weather is warmer and we'll have a whole new list of tasks that we'll need help and guidance with. For now, I'd better get back to work and on to the rest of the laundry room.
We had planned to be with family in North Carolina today, but snow prevented our travel, so, here in Baltimore, I very slowly returned to working on the house.
I miss our contractor. His name is Gerry and he has an assistant named Kyle. Almost every day, for the two weeks before Christmas, they were at our house burning through To Do lists with work in nearly every room.
One of those rooms was the laundry room, and the item on the To Do list was Cut Hole in Brick Wall for Dryer Vent.
Behold the window in the laundry room as it looked when T&H first bought the house. In addition to being a pleasant home for many a spider, the window features a lovely stray cat entrance to the right and a convenient dryer vent to the left.
Had it not been for Gerry, the whole idea of re-routing our dry vent would have completely flown under our radar. With the thousands of individual tasks that need to be completed in this house, coupled with the fact that none of us have ever owned a house or a dryer before, I'm sure that our solution to this little problem would have been to install a newer, shinier, water-tight, cat-door-less version of the system shown above.
But when I was talking with Gerry a few months ago, and we were going over some of the plans for the rehabilitation of the house, he was listing out all of the tasks for the laundry room: ripping out shower, removing panelling, adding water lines, reinstalling panelling, cleaning brick, hanging sink, moving electrical, installing new window, cutting hole in the brick for a proper dryer vent....
It just rolled off the list like it was the obvious and easy thing to do.
And to anyone out there who is going, "Well, duh," but who also hasn't actually rented and wielded a hand-held diamond core drill with a 4" bit and cut through 8 inches of questionably mortared structural brick wall... well, I guess you're still right, but you gotta see this thing in action:
I am really glad that Gerry and Kyle were here to do this. For them, it was simple and obvious, and it was something that they already knew how to do. I think that if we ever need another hole cut in our wall, I would not be terrified to do it myself, but only because I have had the opportunity to watch and learn from these professionals.
It was so cool! And so quick, easy, and clean!
First, Gerry drilled a small hole through the wall from the inside, to mark the coring location on the outside of the wall.
He positioned the hole high on the wall so that the vent would be easier to access for cleaning, both from the inside and outside of the house.
He cut plywood for a jig to hold the core drill in place while beginning the cut, and he angled the corer slightly upward, as it cut into the house, so that if water were ever to get into the vent, it would drain out of the house, not in.
After Gerry started the cut, Kyle went inside to wet vac any slurry that might come through the wall. I ran inside to take pics.
Much nicer than taking a chunk out of our window space!
| Outside |
| Inside |
The vent and duct then got inserted, and the vent fastened to brick wall with screws and sealed with caulk. I mentioned before that the mortar in this wall is questionable, and though Gerry was able to cut a beautiful clean hole straight through, when fastening the vent to the brick, one of the screws met with a soft spot in the mortar.
And I got to learn a new trick! In order to get the screw to bite in a hole that was now a bit too large, Gerry inserted a couple strips of metal into the hole, much like you might with toothpicks into a hole in wood where a hinge has ripped out and you want to put the same screws back in the same place.
And voila! We now have a beautifully finished dryer vent, hockey masked to discourage vermin. A huge improvement.
Our budget for professionals is running out, so we probably won't be able to work with Gerry again until spring, when the weather is warmer and we'll have a whole new list of tasks that we'll need help and guidance with. For now, I'd better get back to work and on to the rest of the laundry room.

Friday, December 17, 2010
Basement Laundry, Part IV: Transitions
A week ago I wrote about cleaning the basement floor in preparation for paint.
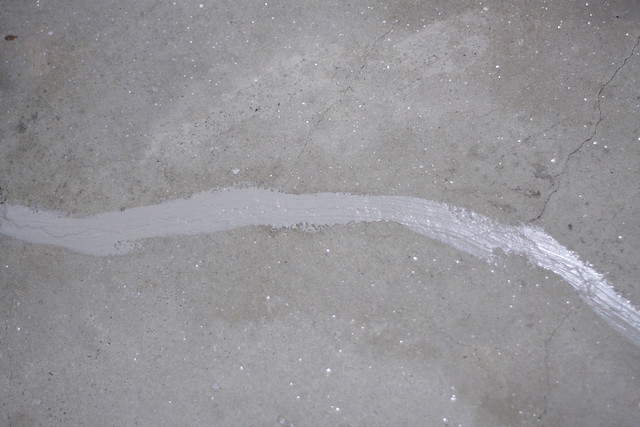
In the days following that purge, I put space heaters inside and outside of the laundry room, to dry the floor and bring it up to temperature. I also caulked all the larger cracks in the floor with a cementitious masonry caulk.
Let me tell you something, masonry caulk is not easy to get out of the tube. That stuff is thick. Or maybe I was doing something wrong, but it sure gave my grip muscles a work out. Or, as I like to call them, my ice cream scooping muscles.
By the way, when looking at that picture, do you see what I see? Because I see sparkles!
After the caulking was down, I waited. After three days, the floor was still damp at the edges and the caulk was still tacky. Hyeseung and I took our shoes off to enter the room, and we worked on painting the walls, the porous, dark, wood walls.
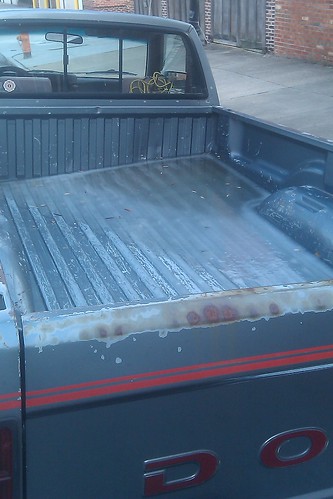
Then, on Sunday it rained. It rained enough to fill the corner of the bed of my truck. See, I wasn't thinking and I parked it on a downhill, and when it started raining, I didn't remember to move it to an uphill so the bed would drain.
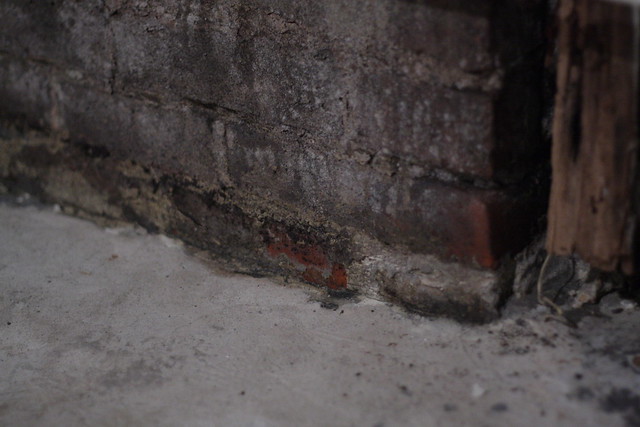
I mentioned, in the post about the basement shower, that the brick walls in the laundry room are water damaged. They still are; and we haven't fixed the root problem yet. We have a whole plan for digging them out and fixing the water problem. But we can't do that until spring.
In terms of painting the basement floor, that means the transition from brick wall to concrete floor won't be dry until Spring.
With our contractor and his assistant here working on the windows this week, I asked his opinion on painting the floor. He has advised us to simply not paint it until we have taken care of the water problem, and I think that's what we're going to do.
It's still great that we cleaned the floor, and we'll clean it again in the Spring when we tackle the wall.
Until then we'll focus on running the electrical (to do), painting the walls (mostly done), installing the window (done), and getting those laundry machines up and running.
In the days following that purge, I put space heaters inside and outside of the laundry room, to dry the floor and bring it up to temperature. I also caulked all the larger cracks in the floor with a cementitious masonry caulk.
Let me tell you something, masonry caulk is not easy to get out of the tube. That stuff is thick. Or maybe I was doing something wrong, but it sure gave my grip muscles a work out. Or, as I like to call them, my ice cream scooping muscles.
By the way, when looking at that picture, do you see what I see? Because I see sparkles!
After the caulking was down, I waited. After three days, the floor was still damp at the edges and the caulk was still tacky. Hyeseung and I took our shoes off to enter the room, and we worked on painting the walls, the porous, dark, wood walls.
Then, on Sunday it rained. It rained enough to fill the corner of the bed of my truck. See, I wasn't thinking and I parked it on a downhill, and when it started raining, I didn't remember to move it to an uphill so the bed would drain.
| Taken Tuesday. By then it had frozen solid. |
I mentioned, in the post about the basement shower, that the brick walls in the laundry room are water damaged. They still are; and we haven't fixed the root problem yet. We have a whole plan for digging them out and fixing the water problem. But we can't do that until spring.
In terms of painting the basement floor, that means the transition from brick wall to concrete floor won't be dry until Spring.
| This is about the driest it gets. |
It's still great that we cleaned the floor, and we'll clean it again in the Spring when we tackle the wall.
Until then we'll focus on running the electrical (to do), painting the walls (mostly done), installing the window (done), and getting those laundry machines up and running.
Saturday, December 11, 2010
Basement Laundry Part III: Forearm Forklift
One of the particular challenges of this house is narrow passageways. For instance, the widest entrance to the backyard is 28.5 inches. (Try getting a back hoe through that.)
Inside the house there are tight corners and narrow stairways. Moving from room to room requires elevation changes and turns and winding around. "Wait, what floor are we on?" is a frequent query. There is no enfilade. The charm factor is through the roof, but so is the dread of the days you have to maneuver the relocation of large objects.
There are two ways to get to the basement. One requires you to go down the "servants' stair", the steep, narrow, secondary stairway at the back of the house. The other requires you to exit the house and re-enter through the back door, which opens directly to the basement. This back door is about 30" below grade. There is an approximately 3 ft x 3 ft x 30" deep hole in front of the door, with a little brick retaining wall holding back the earth.
Our best guess is that at some time in the past, there were wooden steps in this cavity, but for whatever reason, no such walking aid is present now.
So, which twisty turny, narrow route do we take to get two giant appliances into the basement?
The laundry room is not ready for its machines, but we would like to move the washer and dryer out of the 1st floor dining room and into the basement to await installation.
These are standard size machines: 27" being their narrowest dimension. So the narrow back stair, with the right angle entrance, never had a chance. In the only other option, the back door opening is too small, but if we take the bars off the door, we get a 27 3/4" passageway. And that will have to do.
And this is the part of the blog where I become a shill for the Forearm Forklift people.
There is a very particular sense of elation, energy, and freedom that is evoked by the finding of the perfect tool for an arduous job.
Don't get me wrong, these suckers were still heavy: particularly the washer. But unlike the scene during which the old, smaller, broken machines were removed from the basement (five people, a push cart, wrenches, ratchets, hammers, swearing), today's move, with our little As Seen On TV helpers resulted in zero damage to the house, zero damage to the machines, and zero damage to the movers.
It's the type of tool that makes you want to find other things to use it on, even if you don't need to. It's the giant axe, the super glue, the deep fryer of moving tools. I'm sure we'll be putting it to both good and frivolous use.
Now the laundry machines are one huge step closer to cleaning our clothes, and the fear of future furniture maneuvers is no longer crippling, nor are the maneuvers themselves.
Inside the house there are tight corners and narrow stairways. Moving from room to room requires elevation changes and turns and winding around. "Wait, what floor are we on?" is a frequent query. There is no enfilade. The charm factor is through the roof, but so is the dread of the days you have to maneuver the relocation of large objects.
There are two ways to get to the basement. One requires you to go down the "servants' stair", the steep, narrow, secondary stairway at the back of the house. The other requires you to exit the house and re-enter through the back door, which opens directly to the basement. This back door is about 30" below grade. There is an approximately 3 ft x 3 ft x 30" deep hole in front of the door, with a little brick retaining wall holding back the earth.
| Perfect for small people. Like gnomes. |
Our best guess is that at some time in the past, there were wooden steps in this cavity, but for whatever reason, no such walking aid is present now.
So, which twisty turny, narrow route do we take to get two giant appliances into the basement?
The laundry room is not ready for its machines, but we would like to move the washer and dryer out of the 1st floor dining room and into the basement to await installation.
These are standard size machines: 27" being their narrowest dimension. So the narrow back stair, with the right angle entrance, never had a chance. In the only other option, the back door opening is too small, but if we take the bars off the door, we get a 27 3/4" passageway. And that will have to do.
![]() |
| The boxes wouldn't have fit, so we unboxed the machines and wrapped 'em in butcher paper. |
And this is the part of the blog where I become a shill for the Forearm Forklift people.
There is a very particular sense of elation, energy, and freedom that is evoked by the finding of the perfect tool for an arduous job.
Don't get me wrong, these suckers were still heavy: particularly the washer. But unlike the scene during which the old, smaller, broken machines were removed from the basement (five people, a push cart, wrenches, ratchets, hammers, swearing), today's move, with our little As Seen On TV helpers resulted in zero damage to the house, zero damage to the machines, and zero damage to the movers.
It's the type of tool that makes you want to find other things to use it on, even if you don't need to. It's the giant axe, the super glue, the deep fryer of moving tools. I'm sure we'll be putting it to both good and frivolous use.
Now the laundry machines are one huge step closer to cleaning our clothes, and the fear of future furniture maneuvers is no longer crippling, nor are the maneuvers themselves.
Thursday, December 9, 2010
Basement Laundry, Part II: What a Floor Wants
Ambrose laid down the pen, and because the floor sloped where the house had settled, it rolled down the table, and down the floor-boards and under the mahogany sideboard, and lay there among napkin rings and small coins and corks and the sweepings of half a century.Do you know how much filth can work its clever way into the pores of a basement concrete floor over sixty or so years? Well, yesterday, I found out.
Evelyn Waugh, Put Out More Flags
| Just scratching the surface (literally). |
I figured I could clean the floor, on Monday. Let it dry overnight with a space heater warming up the place, then on Tuesday, fill the holes (there's a ~4" diameter, 2" deep hole in the center of the floor where a post once was) and shop-vac the floor again, then Wedenesday I expected to be able to acid etch the concrete and paint the floor....
Well, things never go as planned. Monday, with the help of Hyeseung, we cleaned the whole room. I shop-vac-ed the floor, then mopped it and shop-vac-ed it again. I put a space heater in the room to help it dry and to hopefully bring the space up to painting temperature. Tuesday I filled the big hole in the middle of the floor, and shop-vac-ed again. Wednesday, the hole patch was not yet the color I was expecting, so I postponed the acid prep and painting, but I did mop the rest of the floor again and shop-vac again.
Yesterday I got down to the nitty gritty, the serious floor cleaning. On the floor with scraper in hand, I clawed and dug and forced out all the history that was hiding wedged under moldings, thresholds, and wall framing members.
I found that at these locations, along most of the walls, were remnants of some kind of paper insulation/underlayment for some kind of flooring:
My first thought was, "Did they have carpeting down here!?" But then I took a closer look at certain patches stubborn adhesive that spot the concrete here and there:
And I realized, I've seen this MO before.
Throughout this house, in the locations that have finished floors that are not hardwood, there is some kind of plastic flooring. I would call it vinyl, but I don't think that's quite right. The 1st floor kitchen has it. A couple of the bathrooms have it, as well as the top floor kitchenette. (I'll post floor plans soon.)
In order to finish the one bathroom that we now do have finished, I ripped up the plastic floor (and found hard wood beneath). It took about 10-12 hours of scraping to get the floor up off the wood:
I'm really glad I didn't find myself with the task of removing this flooring in the basement. I think a flood is probably what did the job, or precipitated the doing the job anyway. At some point in this house's recent history, the basement must have held standing water, about 4 to six inches deep. Here's a shot of what the bottom edge of a typical portion of panelling in the basement looks like:
| Yummy! |
So, back to the scraping. I scraped and swept and repeated until I couldn't find anything more to scrape. Then I vacuumed. Then I mopped the floor again. Now, I figured, it's ready for etching. This was at about 11am yesterday. So I put on galoshes and my Mr Clean Nyplex gloves. I tracked down a respirator and my eye shields. I mixed 1 lb of sulfamic acid etcher with a gallon of hot water in a standard water jug, capped it and poked some holes in the top plastic to fashion a "watering can", and I doused the floor in acid.
As the acid hits the floor, it sort of foams and makes that classic horror movie acid dissolving sound. HISSSSS..... and fizzles to nothing. It's like putting hydrogen peroxide on a wound, only not painful and much more dramatic. It was, in a word, neat.
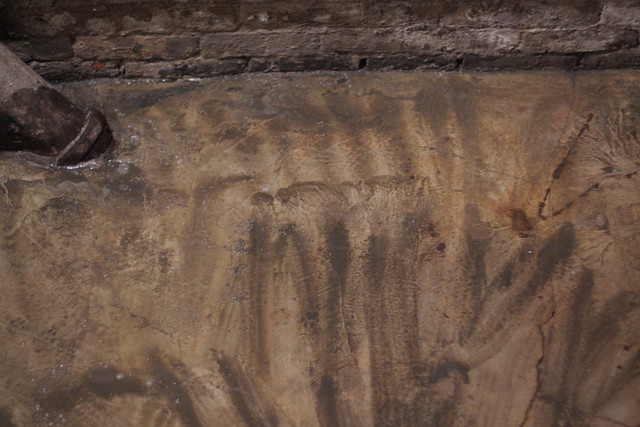
So, then I let it sit for about 10 minutes, after which I started scrubbing. That's when the filth's full battalion emerged from every hiding space, every pore, to defend the status quo:
| Scrub tracks in the war against grime. |
In the end, I power-washed the filth army to oblivion, with a layover in a wet vac. Power-washing is super satisfying. All told, in the course of power-washing those 40 or so square feet, I filled our shop-vac about twenty times. Which means I sucked up somewhere around 100 gallons of black, and later grey, and later clear, water. Thank the lord there was a toilet in that room.
The acid etching revealed some pretty large cracks in the concrete, and I also had to touch up that hole patch I had mentioned. I am wondering if the paint we have will span the cracks, or if I need to go buy some kind of filler and let that set. I am using a two-part water-based epoxy paint, designed for garage floors. It seems fairly robust, but can it span an eighth inch crack?
If you got ideas, please let me know. I'm going to go downstairs and see if the place is dry yet. And shop-vac some more, of course.
Wednesday, December 8, 2010
Basement Laundry, Part I: Basement Shower
The first time I laid eyes on the laundry room, I didn't even notice the laundry machine or the gas hookup or the dryer exhaust. All I saw was Basement Shower.
"Awesome! Basement Shower!" I thought to myself (or maybe said aloud to everyone). When I was little, we had a shower in the basement of our home, and when my brothers and I were particularly filthy, that's where we were sent, via the side door, direct to the basement, to hose off. In that house the shower was just mounted in the giant space that constituted the basement. There was no special Room. Here in Baltimore, I'd found a luxuriously partitioned analog to the fondly remembered basement shower of my childhood.
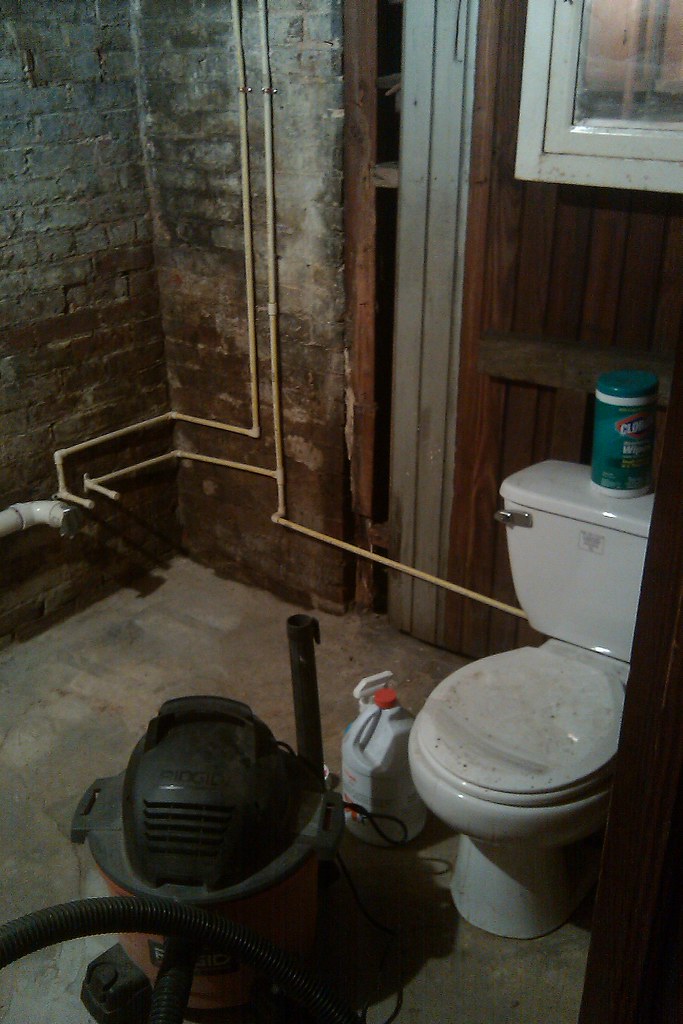
Then we learned more about masonry, mold, mildew, and plumbing.
As you may be able to tell from the picture above, the little shower in the basement is bordered by brick foundation walls on two sides. And those two sides just happen to be the corner of the basement that exhibits the worst water damage of all our below-grade masonry walls. Originally, or, rather, when the housing inspector came through, it was hypothesized that the shower was the culprit, but we now know that the water is coming in from the outside. That corner corresponds to the point at which the old gutters emptied all of the rain water from the roof. Over time, land that was once graded away from our house settled low at this point, and, for who knows how many years, the gutters have been pouring into the foundation here, soaking the wall, eroding the mortar, nourishing intrepid ivy roots (and happy mold and mildew), and probably sometimes even draining into the shower.
Add to this the fact that the dedicated laundry area of this room is tiny: maybe two feet of space from the front of the dryer to the edge of that wooden shower/toilet divider; also add the assertion from our plumber that bringing this shower up to code would be impossible, given the geometric constraints; and the result is a tidy plan for shower demolition.
But what about the toilet, you ask? It stays. For lots of reasons, but basically for any person in the basement who doesn't want to go to the second floor to use the restroom.
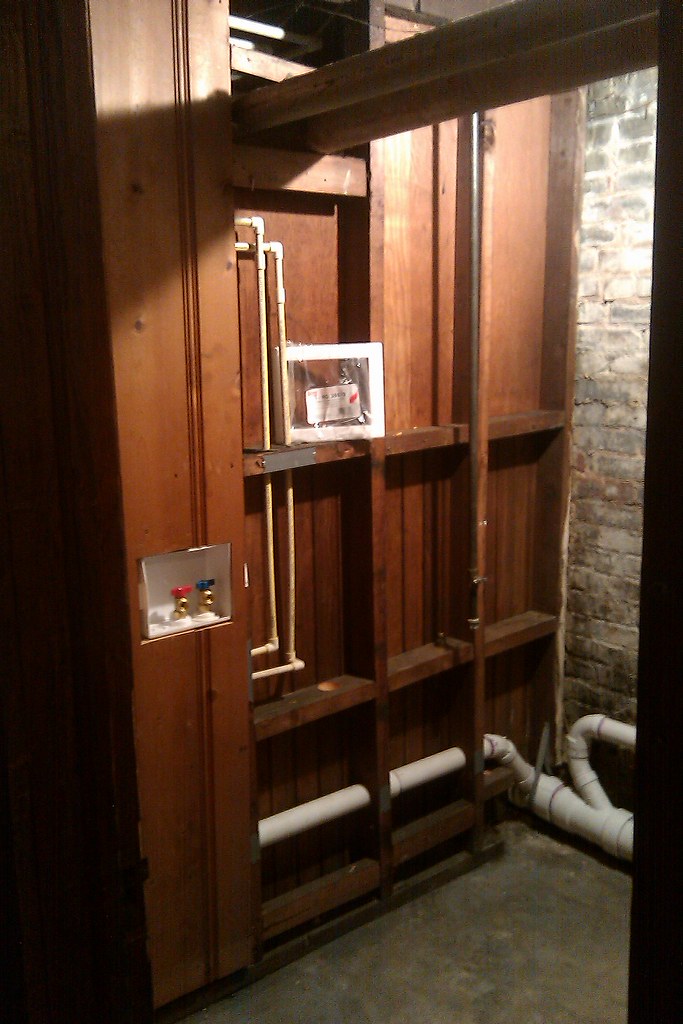
Our plumber demolished the shower plumbing a couple months ago and cemented the drain. Shortly thereafter I demolished the divider wall between toilet and once-shower. I also removed and trashed a few pieces of the silver-colored paneling shown in the above photograph, pieces that were rotted and mildewed. While roughing in all of the new supply and waste lines for the house, our plumber ran lines to the laundry room for a washing machine, the toilet, and a large sink to occupy some of the space where the shower once was.


A toilet has been re-installed, and the rest of the water lines remain roughed-in. We bought the new washer and dryer over a month ago. They wait, hulking, cardboard-sheathed masses, in the dining room above.
My job this week is to finish the room and clear a pathway by which to move the appliances into their forever home.
Stay tuned!
"Awesome! Basement Shower!" I thought to myself (or maybe said aloud to everyone). When I was little, we had a shower in the basement of our home, and when my brothers and I were particularly filthy, that's where we were sent, via the side door, direct to the basement, to hose off. In that house the shower was just mounted in the giant space that constituted the basement. There was no special Room. Here in Baltimore, I'd found a luxuriously partitioned analog to the fondly remembered basement shower of my childhood.
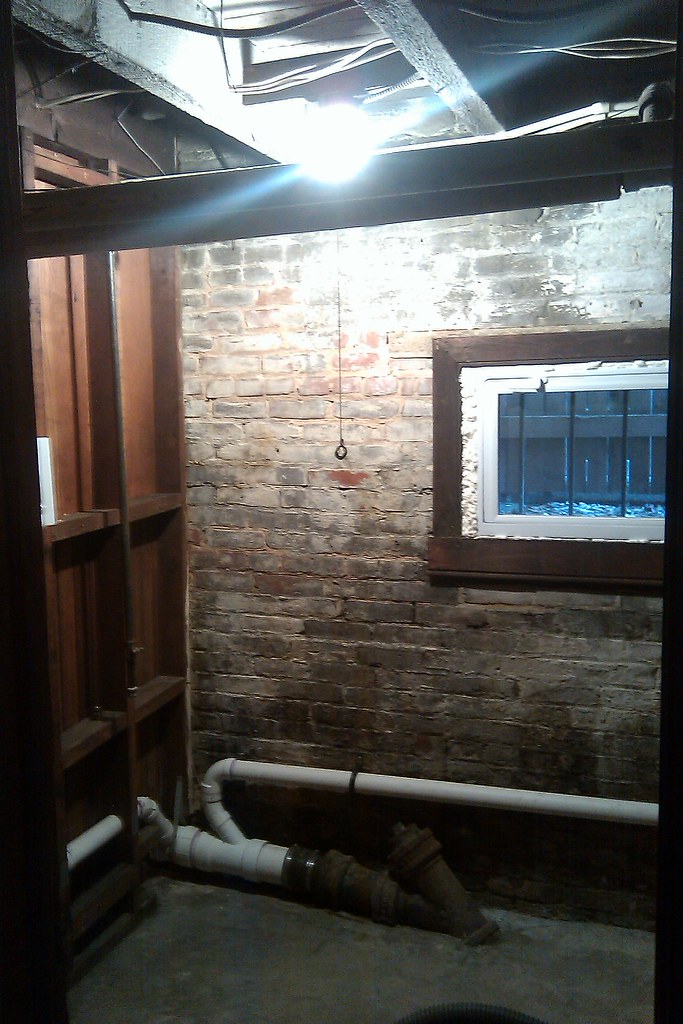
Then we learned more about masonry, mold, mildew, and plumbing.
![]() |
| (click image to enlarge) |
As you may be able to tell from the picture above, the little shower in the basement is bordered by brick foundation walls on two sides. And those two sides just happen to be the corner of the basement that exhibits the worst water damage of all our below-grade masonry walls. Originally, or, rather, when the housing inspector came through, it was hypothesized that the shower was the culprit, but we now know that the water is coming in from the outside. That corner corresponds to the point at which the old gutters emptied all of the rain water from the roof. Over time, land that was once graded away from our house settled low at this point, and, for who knows how many years, the gutters have been pouring into the foundation here, soaking the wall, eroding the mortar, nourishing intrepid ivy roots (and happy mold and mildew), and probably sometimes even draining into the shower.
Add to this the fact that the dedicated laundry area of this room is tiny: maybe two feet of space from the front of the dryer to the edge of that wooden shower/toilet divider; also add the assertion from our plumber that bringing this shower up to code would be impossible, given the geometric constraints; and the result is a tidy plan for shower demolition.
But what about the toilet, you ask? It stays. For lots of reasons, but basically for any person in the basement who doesn't want to go to the second floor to use the restroom.
Our plumber demolished the shower plumbing a couple months ago and cemented the drain. Shortly thereafter I demolished the divider wall between toilet and once-shower. I also removed and trashed a few pieces of the silver-colored paneling shown in the above photograph, pieces that were rotted and mildewed. While roughing in all of the new supply and waste lines for the house, our plumber ran lines to the laundry room for a washing machine, the toilet, and a large sink to occupy some of the space where the shower once was.
A toilet has been re-installed, and the rest of the water lines remain roughed-in. We bought the new washer and dryer over a month ago. They wait, hulking, cardboard-sheathed masses, in the dining room above.
My job this week is to finish the room and clear a pathway by which to move the appliances into their forever home.
Stay tuned!
Tuesday, December 7, 2010
Into the Middle of Things
Hello, blogosphere, and, more particularly, friends and family!
Today I begin telling the story of a nineteenth century, three story, brick row house in Baltimore, Maryland. Our house was built, on speculation, in the wake of the Civil War. A hundred and thirty-some years of care, and a few recent years of abandonment and neglect later, my brother and his wife call this place their home. They own it; they are not squatters; however, if you were to walk in the door right this second, you might question that assertion. Right this second, it's more of a construction site than a home.
This is where I come in. Together with the help of my brother, Toby, and his wife, Hyeseung, and various visiting friends and relatives, (and some licensed professionals like contractors, plumbers, roofers, and other excellent people) we are dedicating one year to making this house T&H's home.
Our plan here is pretty simple. T&H both work full-time outside the home, and I work full-time on the home. And then a good chunk of T&H's free-time is spent working on the home, too.
This dedicated year began September, 2010, and it will end with August 2011.
So here we are, smack dab in the middle of things. Much has been done already, and I will do my best to catch everyone up to speed on the basics of the house and the details of the plan in good time. For now, here's the brass tacks:
roof has been replaced:
main water supply line to the house has been replaced:
all interior plumbing supply lines have been replaced:
cast iron waste/vent stacks which ran along the outside of the house have been replaced with PVC stacks that run inside the house:
all interior waste lines have been replaced;
one bathroom has been finished and hooked up to the new plumbing;
sideyard, backyard and garage have been cleared of debris (sideyard shown);
the tree growing out of the garage door has been conquered and uprooted!
And we bought a sweet truck.
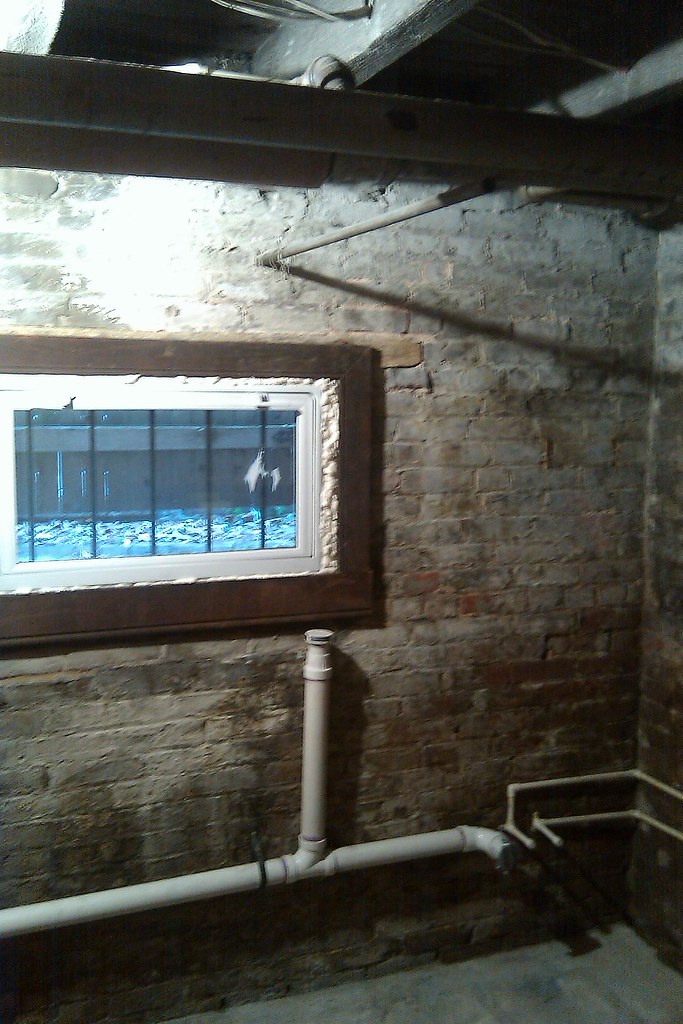
Currently, my main focus is The Laundry Room. I'll write all about that starting tomorrow, but for now, I leave you with a before picture:
Lovely, no?
Until tomorrow,
S
Today I begin telling the story of a nineteenth century, three story, brick row house in Baltimore, Maryland. Our house was built, on speculation, in the wake of the Civil War. A hundred and thirty-some years of care, and a few recent years of abandonment and neglect later, my brother and his wife call this place their home. They own it; they are not squatters; however, if you were to walk in the door right this second, you might question that assertion. Right this second, it's more of a construction site than a home.
This is where I come in. Together with the help of my brother, Toby, and his wife, Hyeseung, and various visiting friends and relatives, (and some licensed professionals like contractors, plumbers, roofers, and other excellent people) we are dedicating one year to making this house T&H's home.
Our plan here is pretty simple. T&H both work full-time outside the home, and I work full-time on the home. And then a good chunk of T&H's free-time is spent working on the home, too.
This dedicated year began September, 2010, and it will end with August 2011.
So here we are, smack dab in the middle of things. Much has been done already, and I will do my best to catch everyone up to speed on the basics of the house and the details of the plan in good time. For now, here's the brass tacks:
roof has been replaced:
main water supply line to the house has been replaced:
all interior plumbing supply lines have been replaced:
cast iron waste/vent stacks which ran along the outside of the house have been replaced with PVC stacks that run inside the house:
all interior waste lines have been replaced;
one bathroom has been finished and hooked up to the new plumbing;
sideyard, backyard and garage have been cleared of debris (sideyard shown);
the tree growing out of the garage door has been conquered and uprooted!
And we bought a sweet truck.
Currently, my main focus is The Laundry Room. I'll write all about that starting tomorrow, but for now, I leave you with a before picture:
Lovely, no?
Until tomorrow,
S
Labels:
big picture,
laundry room,
plumbing,
roof,
truck,
yard
Subscribe to:
Posts (Atom)